python 網路爬蟲
by Shawn
目錄
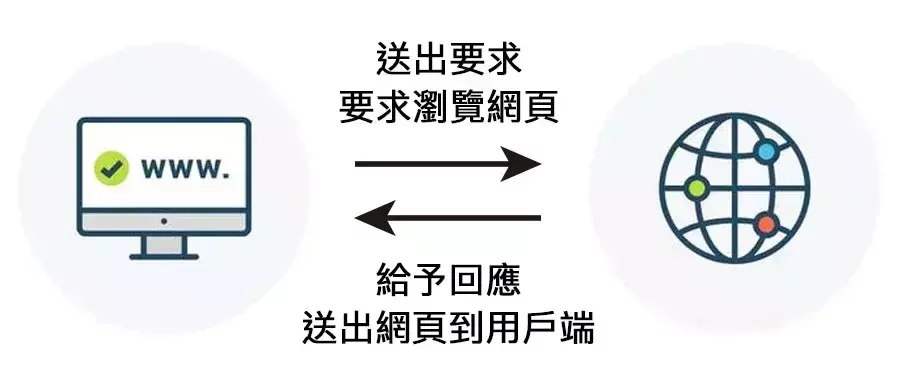
網路爬蟲
網路爬蟲
- 自動化爬取資料的程式
- 大量且快速的從網路上擷取資料
- 更有效地進行數據收集與分析
網路爬蟲
- 網路爬行:建立索引
- 網頁抓取:擷取特定內容
網路爬蟲
網路爬行
在一堆未分類的書中
不斷瀏覽
並將內容記下來
提供後續使用
網頁抓取
根據剛才爬到的內容
再從特定一本書中
尋找需要的資料
網路爬蟲
- 從社群媒體大量下載圖片
- 比較不同網購平台的商品價格
- 取得股票資訊
- ... ... 等
網路爬蟲
Requests
Requests
Requests
- python 的一個外部函式庫
Requests
- python 的一個外部函式庫
- 輕鬆地發送 HTTP 請求
Requests
- python 的一個外部函式庫
- 輕鬆地發送 HTTP 請求
- 簡單易上手,適合各種網路操作
下載、引入函式庫
下載、引入函式庫
pip install requests
Windows 在「 命令提示字元 」中
Mac 在「 終端機中 」中輸入
下載、引入函式庫
pip install requests
Windows 在「 命令提示字元 」中
Mac 在「 終端機中 」中輸入
import requests在 python 檔案開頭引入函式庫
爬取第一個網站
爬取第一個網站
import requests


url = "https://27th.ckefgisc.org"
response = requests.get(url=url)

print(response)
爬取第一個網站
import requests


url = "https://27th.ckefgisc.org"
response = requests.get(url=url)

print(response.text)
爬取第一個網站
import requests


url = "https://27th.ckefgisc.org"
response = requests.get(url=url)

print(response.text)
引入函式庫
爬取第一個網站
import requests


url = "https://27th.ckefgisc.org"
response = requests.get(url=url)

print(response.text)
發送請求
引入函式庫
爬取第一個網站
import requests


url = "https://27th.ckefgisc.org"
response = requests.get(url=url)

print(response.text)
發送請求
輸出回覆內容
引入函式庫
爬取第一個網站
爬取第一個網站
輸出:
爬取第一個網站
<!DOCTYPE html>
<html lang="zh-TW">
<head>
<meta charset="utf-8"/>
<meta content="width=device-width, initial-scale=1" name="viewport"/>
<meta content="建中電研,北一資研,電研社,資訊社,建北電資,社團" name="keywords">
<script src="https://code.jquery.com/jquery-3.6.1.min.js"></script>
<script src="/scripts/include.js"></script>
<script src="/scripts/news.js"></script>
<link href="/images/favicon.ico" rel="shortcut icon"/>
<link href="/styles/index.css" rel="stylesheet"/>
<title>
建北電資 | CKEFGISC
</title>
</meta>
</head>
<body>
<header>
</header>
<div id="main-container">
<div class="section" id="title-section">
<h1>
全台最「電」
</h1>
<h1>
資訊系社團
</h1>
<h2>
<a href="/news/posts/iscoj-ctf/4SygTCnmdkQWzpEd/4ZVGbyywh5xSQdKRhpxFKDkX9WmFTMHB.html" style="all:inherit">
建中電子計算機研習社×北一女中資訊研習社
</a>
</h2>
<a href="/linktree/">
點我加入
</a>
</div>
<div class="section" id="news-section">
<div class="section-title">
<p>
最新消息
</p>
</div>
<ul class="line-list" id="news-list">
</ul>
</div>
<div class="section" id="lesson-section">
<div class="section-title">
<p>
課程介紹
</p>
</div>
<div id="lesson-links">
<a href="/lesson#major-class" id="major-lesson">
大社課
</a>
<a href="/lesson#noon-class" id="noon-lesson">
北資中午小社課
</a>
<a href="/lesson#after-class" id="after-lesson">
建北電資聯合
<br/>
放學小社課
</a>
</div>
</div>
<div class="section" id="faq-section">
<div class="section-title">
<p>
常見問答
</p>
</div>
<ul class="line-list">
<li>
<p class="qq">
Q:小社是星期幾?
</p>
<p>
A:
</p>
<p>
每天放學之後都有喔~(除了段考週和前一週)
</p>
<p class="btn">
<a class="btn_a" href="/lesson/">
點我看小社介紹
</a>
</p>
</li>
<li>
<p class="qq">
Q:學長姐,我有第八節,來得及來聽課嗎?
</p>
<p>
A:
</p>
<p>
可以喔!
</p>
<p>
我們基本上會等到北資的同學5:10下課可以安全走到建中的時間才開始上課,不論是北資還是建電的數資、科學班學生,都歡迎來參加小社!
</p>
</li>
<li>
<p class="qq">
Q:我要怎麼來聽社課呢?
</p>
<p>
A:
</p>
<p>
只要你是建北電資的社員,都可以直接來聽課,完全不用事先報名的啦XD
</p>
</li>
</ul>
</div>
<div class="section" id="aboutsite-section">
<div class="section-title">
<p>
關於本站
</p>
</div>
<div class="aboutsite_sec">
<div class="aboutsite_title">
本站簡介
</div>
<div class="aboutsite_text">
本站是建中電研社以及北一女資研社的社團官網。在這個網站上,我們不僅介紹本社團的背景、宗旨和組織架構,還紀錄建北電資生活的點點滴滴,包括社團內的活動、成就、照片和回憶,讓社員們能夠在這裡找到屬於自己的回憶和歷程。此外,這個社網也充當了一個資源庫的角色,我們會將社團內部的教學簡報、技術文件和相關資訊儲存於此,供社員們在需要時輕鬆取得。
<br/>
</div>
</div>
<div class="aboutsite_sec">
<div class="aboutsite_title">
<a href="/news/posts/iscoj-ctf/4SygTCnmdkQWzpEd/D9bWhXXDuHgTQ8QXb5yAps4gk7xHqEyc.html" style="all:inherit">
緣起
</a>
</div>
<div class="aboutsite_text">
建北電資以往皆有架設網站作為招生及宣傳用途。但是自從建電社辦的伺服器被學校沒收之後,一直以來都找不到一個良好的網站架設環境,也沒有一個地方讓學術們統一放置教材供學弟妹使用。因此,在一三上幹了之後,一二學術長檸檬便一直希望鹽亞倫可以將他們沒有做出的社網完成。因此,不會css的鹽亞倫便找了溫室菜以及北資學術長嗯嗯,嘗試從頭寫出一個網站,並且透過github pages進行架設。
<br/>
<div style="text-align: right;">
<a class="aaa" href="/about/site.html">
>>> 閱讀更多本站歷史
</a>
</div>
</div>
</div>
<div class="aboutsite_sec">
<div class="aboutsite_title">
製作團隊
</div>
<div class="aboutsite_text">
專案管理:建電42nd吳亞倫
<br/>
網站架設:北資36th蘇怡恩、建電42nd蔡政廷
<br/>
<div style="text-align: right;">
<a class="aaa" href="/about/site.html">
>>> 更多本站資訊
</a>
</div>
</div>
</div>
</div>
</div>
<footer>
</footer>
<script>
listNews(0, 4);
</script>
</body>
</html>輸出:
HTTP 方法
HTTP 方法
| 方法 | 說明 |
| GET | 提交請求( 公開參數 ) |
| POST | 提交請求( 隱藏參數 ) |
| PUT | 提供最新內容 |
| DELETE | 刪除指定內容 |
| 屬性、方法 | 說明 |
| text | 訊息內容( 字串 ) |
| content | 訊息內容( 二進制 ) |
| raw | 串流訊息內容( 二進制 ) |
| encoding | 回應訊息的編碼 |
| status_code | 回應訊息的狀態 |
| json() | 將訊息經過 json 解碼 |
避免超時
在程式碼中加入 timeout,
避免等待時間過長。
例如:
避免超時
在程式碼中加入等待時間,
避免陷入漫長的等待。
例如:
response = requests.get(url=url, timeout=3)避免超時
避免超時
避免超時
等待時間不是整個回應的下載時間限制,
而是指如果伺服器沒有在等待時間內回應,
( 通常是以回應的第一個字計算 )
程式碼將會報錯。
檢查 HTTP 狀態碼
檢查 HTTP 狀態碼
HTTP 狀態碼用以表示特定的請求是否完成
可分為:
檢查 HTTP 狀態碼
- 1xx:請求已接受,且正在處理
HTTP 狀態碼用以表示特定的請求是否完成
可分為:
檢查 HTTP 狀態碼
- 1xx:請求已接受,且正在處理
- 2xx:請求已接受,已完成
HTTP 狀態碼用以表示特定的請求是否完成
可分為:
檢查 HTTP 狀態碼
- 1xx:請求已接受,且正在處理
- 3xx:請求已接受,需要重新導向
- 2xx:請求已接受,已完成
HTTP 狀態碼用以表示特定的請求是否完成
可分為:
檢查 HTTP 狀態碼
- 1xx:請求已接受,且正在處理
- 4xx:客戶端出錯
- 3xx:請求已接受,需要重新導向
- 2xx:請求已接受,已完成
HTTP 狀態碼用以表示特定的請求是否完成
可分為:
檢查 HTTP 狀態碼
- 1xx:請求已接受,且正在處理
- 5xx:伺服端出錯
- 4xx:客戶端出錯
- 3xx:請求已接受,需要重新導向
- 2xx:請求已接受,已完成
HTTP 狀態碼用以表示特定的請求是否完成
可分為:
檢查 HTTP 狀態碼
檢查 HTTP 狀態碼
import requests


url = "https://27th.ckefgisc.org"
response = requests.get(url=url)

print(response.status_code)
檢查 HTTP 狀態碼
import requests


url = "https://27th.ckefgisc.org"
response = requests.get(url=url)

print(response.status_code)
檢查 HTTP 狀態碼
import requests


url = "https://27th.ckefgisc.org"
response = requests.get(url=url)

print(response.status_code)
發送請求
引入函式庫
檢查 HTTP 狀態碼
import requests


url = "https://27th.ckefgisc.org"
response = requests.get(url=url)

print(response.status_code)
發送請求
引入函式庫
輸出狀態碼
避免亂碼
避免亂碼
若要將生活中各種文字,
讓電腦可以儲存,
就必須先編碼,
但是如果使用不同編碼方式,
就會產生亂碼。
避免亂碼
避免亂碼
對網頁右鍵「 檢查 」
避免亂碼
對網頁右鍵「 檢查 」
避免亂碼

對網頁右鍵「 檢查 」
避免亂碼
點開「 元素 」欄位
對網頁右鍵「 檢查 」
避免亂碼
可以在裡面找到網頁的編碼方式
點開「 元素 」欄位
對網頁右鍵「 檢查 」
避免亂碼
可以在裡面找到網頁的編碼方式
點開「 元素 」欄位
對網頁右鍵「 檢查 」

避免亂碼
避免亂碼
import requests


url = "http://fengshan.itgo.com/8-14.htm"
response = requests.get(url=url)
response.encoding = "big5"

print(response.text)
避免亂碼
import requests


url = "http://fengshan.itgo.com/8-14.htm"
response = requests.get(url=url)
response.encoding = "big5"

print(response.text)
避免亂碼
import requests


url = "http://fengshan.itgo.com/8-14.htm"
response = requests.get(url=url)
response.encoding = "big5"

print(response.text)
發送請求
引入函式庫
輸出內容
避免亂碼
import requests


url = "http://fengshan.itgo.com/8-14.htm"
response = requests.get(url=url)
response.encoding = "big5"

print(response.text)
發送請求
引入函式庫
輸出內容
將編碼方式改為 big5
避免亂碼
<title>¨«Åª¥xÆW-°ª¶¯¿¤¬F©²</title>避免亂碼
解決前:
避免亂碼
解決後:
<title>走讀台灣-高雄縣政府</title>API
API
API
- Application Programming Interface
API
- Application Programming Interface
- 允許不同軟體之間共享資訊
API
- Application Programming Interface
- 整合與使用不同服務
- 允許不同軟體之間共享資訊
API

用餐者
( 使用者 )
API

服務生
( API )
用餐者
( 使用者 )
API
服務生
( API )
用餐者
( 使用者 )
API
點餐

服務生
( API )
廚師
( 伺服器 )
用餐者
( 使用者 )
廚師
( 伺服器 )
API
點餐
服務生
( API )
廚師
( 伺服器 )
用餐者
( 使用者 )
廚師
( 伺服器 )
API
點餐
傳送
服務生
( API )
廚師
( 伺服器 )
用餐者
( 使用者 )
廚師
( 伺服器 )
API
處理
點餐
傳送
服務生
( API )
廚師
( 伺服器 )
用餐者
( 使用者 )
廚師
( 伺服器 )
API
處理
點餐
傳送
傳送
服務生
( API )
廚師
( 伺服器 )
用餐者
( 使用者 )
廚師
( 伺服器 )
API
點餐
傳送
傳送
處理
送餐
呼叫 API
呼叫 API
API 通常使用 JSON 格式儲存資料,
所以需要用 .json() 讀取。
呼叫 API
呼叫 API
JSON( JavaScript Object Notation )
為 JavaScript 物件的標準格式,
由於其簡單、易毒且兼容性高,
尤其適合 API。
呼叫 API
呼叫 API
import json
import requests


url = "https://opendata.cwa.gov.tw/api/v1/rest/datastore/F-D0047-061?Authorization=rdec-key-123-45678-011121314"
response = requests.get(url=url)

print(response.json())
呼叫 API
import json
import requests


url = "https://opendata.cwa.gov.tw/api/v1/rest/datastore/F-D0047-061?Authorization=rdec-key-123-45678-011121314"
response = requests.get(url=url)

print(response.json())
呼叫 API
import json
import requests


url = "https://opendata.cwa.gov.tw/api/v1/rest/datastore/F-D0047-061?Authorization=rdec-key-123-45678-011121314"
response = requests.get(url=url)

print(response.json())
發送請求
引入函式庫
輸出回覆內容
( 經過 json 解碼 )
呼叫 API
import json
import requests


url = "https://opendata.cwa.gov.tw/api/v1/rest/datastore/F-D0047-061?Authorization=rdec-key-123-45678-011121314"
response = requests.get(url=url)

print(response.json())
呼叫 API
import json
import requests


url = "https://opendata.cwa.gov.tw/api/v1/rest/datastore/F-D0047-061?Authorization=rdec-key-123-45678-011121314"
response = requests.get(url=url)

print(response.json())官方文件
官方文件
BeautifulSoup
BeautifulSoup
BeautifulSoup
- python 的一個外部函式庫
BeautifulSoup
- python 的一個外部函式庫
- 提取 HTML / XML 中的內容
BeautifulSoup
- 提取 HTML / XML 中的內容
- 快速查找與修改
- python 的一個外部函式庫
下載、引入函式庫
下載、引入函式庫
Windows 在「 命令提示字元 」中
Mac 在「 終端機中 」中輸入
pip install beautifulsoup4下載、引入函式庫
Windows 在「 命令提示字元 」中
Mac 在「 終端機中 」中輸入
在 python 檔案開頭引入函式庫
pip install beautifulsoup4from bs4 import BeautifulSoup解析網頁
將 HTML 轉換成可讀取的標籤樹
解析網頁
import requests
from bs4 import BeautifulSoup


url = "https://27th.ckefgisc.org"
response = requests.get(url=url)
soup = BeautifulSoup(response.text, "html.parser")
將 HTML 轉換成可讀取的標籤樹
解析網頁
解析網頁
import requests
from bs4 import BeautifulSoup


url = "https://27th.ckefgisc.org"
response = requests.get(url=url)
soup = BeautifulSoup(response.text, "html.parser")
解析網頁
import requests
from bs4 import BeautifulSoup


url = "https://27th.ckefgisc.org"
response = requests.get(url=url)
soup = BeautifulSoup(response.text, "html.parser")
引入函式庫
解析網頁
import requests
from bs4 import BeautifulSoup


url = "https://27th.ckefgisc.org"
response = requests.get(url=url)
soup = BeautifulSoup(response.text, "html.parser")
發送請求
引入函式庫
解析網頁
import requests
from bs4 import BeautifulSoup


url = "https://27th.ckefgisc.org"
response = requests.get(url=url)
soup = BeautifulSoup(response.text, "html.parser")
發送請求
引入函式庫
解析網頁
解析網頁
import requests
from bs4 import BeautifulSoup


url = "https://27th.ckefgisc.org"
response = requests.get(url=url)
soup = BeautifulSoup(response.text, "html.parser")
發送請求
引入函式庫
html.parser:網頁解析器
解析網頁
import requests
from bs4 import BeautifulSoup


url = "https://27th.ckefgisc.org"
response = requests.get(url=url)
soup = BeautifulSoup(response.text, "html.parser")

print(soup.title)
解析網頁
發送請求
引入函式庫
解析網頁
輸出網頁標題
解析網頁
輸出:
解析網頁
輸出:
<title>建北電資 | CKEFGISC</title>解析網頁
解析網頁
解析網頁
標籤樹
解析網頁
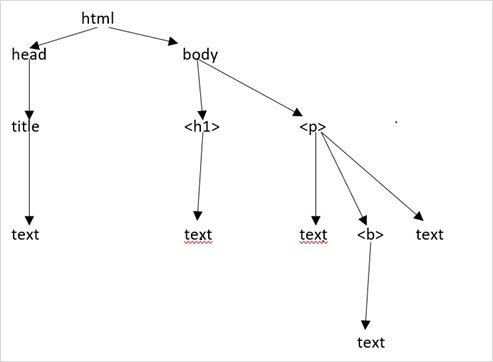
標籤樹
標籤物件的屬性與方法
<h1 id="hello"> Hello World </h1>
屬性( id )
名稱
內容
標籤物件的屬性與方法
標籤物件的屬性與方法
from bs4 import BeautifulSoup

html = '<h1 id="hello"> Hello World </h1>'
soup = BeautifulSoup(html, "html.parser")
tag = soup.h1

print("名稱:", tag.name)
print("屬性:", tag.attrs)
print("ID:", tag["id"])
print("內容:", tag.get_text())
標籤物件的屬性與方法
from bs4 import BeautifulSoup

html = '<h1 id="hello">Hello World</h1>'
soup = BeautifulSoup(html, "html.parser")
tag = soup.h1

print("名稱:", tag.name)
print("屬性:", tag.attrs)
print("ID:", tag["id"])
print("內容:", tag.get_text())
名稱: h1
標籤物件的屬性與方法
from bs4 import BeautifulSoup

html = '<h1 id="hello">Hello World</h1>'
soup = BeautifulSoup(html, "html.parser")
tag = soup.h1

print("名稱:", tag.name)
print("屬性:", tag.attrs)
print("ID:", tag["id"])
print("內容:", tag.get_text())
屬性: {'id': 'hello'}
標籤物件的屬性與方法
from bs4 import BeautifulSoup

html = '<h1 id="hello">Hello World</h1>'
soup = BeautifulSoup(html, "html.parser")
tag = soup.h1

print("名稱:", tag.name)
print("屬性:", tag.attrs)
print("ID:", tag["id"])
print("內容:", tag.get_text())
ID: hello
標籤物件的屬性與方法
from bs4 import BeautifulSoup

html = '<h1 id="hello">Hello World</h1>'
soup = BeautifulSoup(html, "html.parser")
tag = soup.h1

print("名稱:", tag.name)
print("屬性:", tag.attrs)
print("ID:", tag["id"])
print("內容:", tag.get_text())
內容: Hello World標籤物件的屬性與方法
尋找標籤
| 方法 | 說明 |
| find() | 尋找第一個指定的標籤 |
| find_all() | 尋找所有指定的標籤 |
| select() | 以 CSS 選擇器尋找指定的標籤 |
尋找標籤
尋找標籤
from bs4 import BeautifulSoup


html = """
<a class="sister" href="http://example.com/elsie" id="link1">Elsie</a>
<a class="sister" href="http://example.com/lacie" id="link2">Lacie</a>
<a class="sister" href="http://example.com/tillie" id="link3">Tillie</a>
"""

soup = BeautifulSoup(html, "html.parser")

print(soup.find("a"))
# 輸出:<a class="sister" href="http://example.com/elsie" id="link1">Elsie</a>

print(soup.find_all("a"))
# 輸出:[
#   <a class="sister" href="http://example.com/elsie" id="link1">Elsie</a>,
#   <a class="sister" href="http://example.com/lacie" id="link2">Lacie</a>,
#   <a class="sister" href="http://example.com/tillie" id="link3">Tillie</a>
# ]

print(soup.find("a", id="link3"))
# 輸出:<a class="sister" href="http://example.com/tillie" id="link3">Tillie</a>
尋找標籤
from bs4 import BeautifulSoup


html = """
<a class="sister" href="http://example.com/elsie" id="link1">Elsie</a>
<a class="sister" href="http://example.com/lacie" id="link2">Lacie</a>
<a class="sister" href="http://example.com/tillie" id="link3">Tillie</a>
"""

soup = BeautifulSoup(html, "html.parser")

print(soup.find("a"))

print(soup.find_all("a"))

print(soup.find("a", id="link3"))
尋找標籤
<a class="sister" href="http://example.com/elsie" id="link1">
  Elsie
</a>
尋找標籤
from bs4 import BeautifulSoup


html = """
<a class="sister" href="http://example.com/elsie" id="link1">Elsie</a>
<a class="sister" href="http://example.com/lacie" id="link2">Lacie</a>
<a class="sister" href="http://example.com/tillie" id="link3">Tillie</a>
"""

soup = BeautifulSoup(html, "html.parser")

print(soup.find("a"))

print(soup.find_all("a"))

print(soup.find("a", id="link3"))
尋找標籤
[
    <a class="sister" href="http://example.com/elsie" id="link1">
      Elsie
    </a>,
    <a class="sister" href="http://example.com/lacie" id="link2">
      Lacie
    </a>,
    <a class="sister" href="http://example.com/tillie" id="link3">
      Tillie
    </a>
]
尋找標籤
from bs4 import BeautifulSoup


html = """
<a class="sister" href="http://example.com/elsie" id="link1">Elsie</a>
<a class="sister" href="http://example.com/lacie" id="link2">Lacie</a>
<a class="sister" href="http://example.com/tillie" id="link3">Tillie</a>
"""

soup = BeautifulSoup(html, "html.parser")

print(soup.find("a"))

print(soup.find_all("a"))

print(soup.find("a", id="link3"))
尋找標籤
<a class="sister" href="http://example.com/tillie" id="link3">
  Tillie
</a>
尋找標籤
官方文件
官方文件
實作時間
補充
Selenium
Selenium
Selenium
- python 的一個外部函式庫
Selenium
- python 的一個外部函式庫
- 模擬使用者在瀏覽器中的操作
Selenium
- python 的一個外部函式庫
- 模擬使用者在瀏覽器中的操作
- 自動化控制瀏覽器
下載、引入函式庫
下載、引入函式庫
Windows 在「 命令提示字元 」中
Mac 在「 終端機中 」中輸入
pip install beautifulsoup4下載、引入函式庫
Windows 在「 命令提示字元 」中
Mac 在「 終端機中 」中輸入
在 python 檔案開頭引入函式庫
pip install seleniumimport seleniumwebdriver
webdriver
- 類似平常使用的瀏覽器
webdriver
- 類似平常使用的瀏覽器
- 可以透過 Selenium 操作
webdriver
- 類似平常使用的瀏覽器
- 可以透過 Selenium 操作
- 各個瀏覽器都有對應的 webdriver
下載 webdriver
下載 webdriver
開啟第一個網頁
import time
from selenium import webdriver


url = "https://www.google.com"
driver = webdriver.Chrome()
driver.get(url)

time.sleep(5)
driver.close()
開啟第一個網頁
執行後,會彈出相應的瀏覽器視窗。
import time
from selenium import webdriver


url = "https://www.google.com"
driver = webdriver.Chrome()
driver.get(url)

time.sleep(5)
driver.close()
開啟第一個網頁
import time
from selenium import webdriver


url = "https://www.google.com"
driver = webdriver.Chrome()
driver.get(url)

time.sleep(5)
driver.close()
開啟第一個網頁
time:處理時間
引入函式庫
import time
from selenium import webdriver


url = "https://www.google.com"
driver = webdriver.Chrome()
driver.get(url)

time.sleep(5)
driver.close()
開啟第一個網頁
time:處理時間
引入函式庫
設定 webdriver
import time
from selenium import webdriver


url = "https://www.google.com"
driver = webdriver.Chrome()
driver.get(url)

time.sleep(5)
driver.close()
開啟第一個網頁
time:處理時間
引入函式庫
設定 webdriver
開啟 webdriver
並打開網頁
import time
from selenium import webdriver


url = "https://www.google.com"
driver = webdriver.Chrome()
driver.get(url)

time.sleep(5)
driver.close()
開啟第一個網頁
time:處理時間
引入函式庫
設定 webdriver
開啟 webdriver
並打開網頁
等待 5 秒
關閉 webdriver
取得網頁元素
取得網頁元素
| 定位器 | 說明 |
| By.ID | 按 ID 尋找 |
| By.CLASS_NAME | 按 class 尋找 |
| By.CSS_SELECTOR | 按 css 選擇器尋找 |
| By.TAG_NAME | 按標籤名稱尋找 |
| By.LINK_TEXT | 按超連結文字尋找 |
| By.XPATH | 按 xpath 尋找 |
取得網頁元素
取得網頁元素
先在開頭加上這一行
from selenium.webdriver.common.by import By取得網頁元素
取得網頁元素
import time
from selenium import webdriver
from selenium.webdriver.common.by import By


url = "https://google.com"
driver = webdriver.Chrome()
driver.get(url)

element = driver.find_element(By.ID, "id")
# 尋找第一個符合條件的元素

elements = driver.find_elements(By.CLASS_NAME, "class")
# 尋找所有符合條件的元素

time.sleep(5)
driver.close()
取得網頁元素
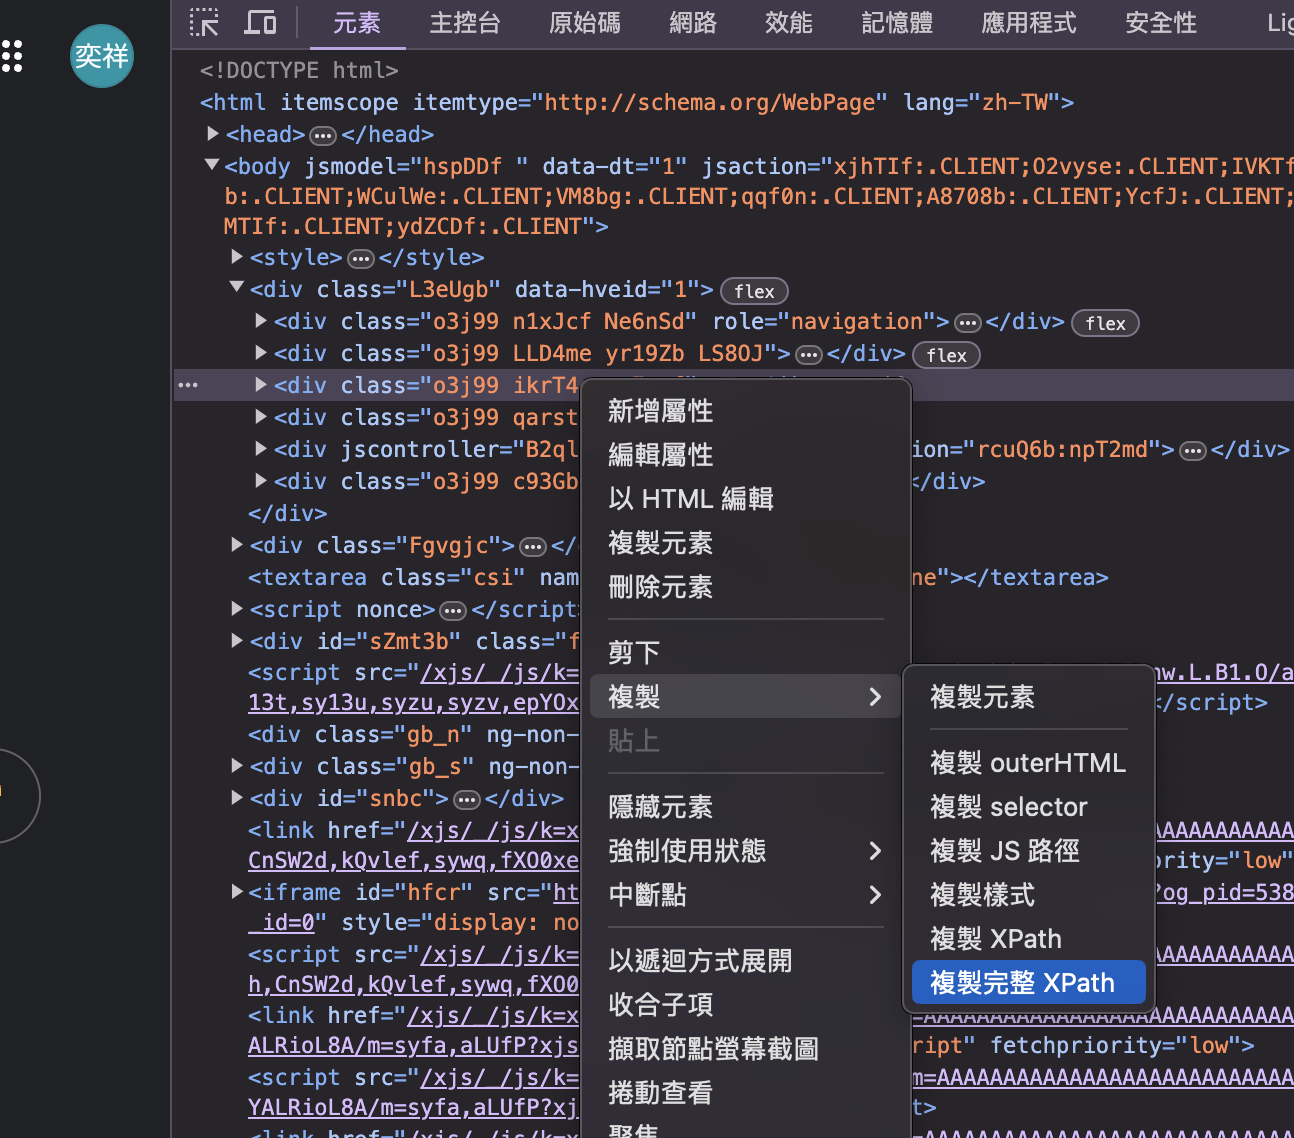
取得網頁元素
對網頁右鍵「 檢查 」,
右鍵要尋找的元素,
點選「 複製 」,
就可複製他的 CSS 尋找器、XPATH ... ... 等。
XPATH 還蠻好用的。
取得網頁元素
取得網頁元素
操作網頁元素
操作網頁元素
| 方法 | 說明 |
| click() | 按下滑鼠左鍵 |
| click_and_hold() | 按住滑鼠左鍵 |
| release() | 鬆開滑鼠 |
| send_key() | 鍵盤輸入 |
| key_down() | 按住鍵盤指定按鍵 |
| key_up() | 鬆開鍵盤指定按鍵 |
操作網頁元素
import time
from selenium import webdriver
from selenium.webdriver.common.by import By
from selenium.webdriver.common.keys import Keys


url = "https://www.google.com"
driver = webdriver.Chrome()
driver.get(url)

button = driver.find_element(By.ID, "button")
button.click()

input_box = driver.find_element(By.ID, "id")
input_box.send_keys("Hello World")
input_box.send_keys(Keys.ENTER)

time.sleep(5)
driver.close()
操作網頁元素
設定 webdriver
開啟 webdriver
並打開網頁
import time
from selenium import webdriver
from selenium.webdriver.common.by import By
from selenium.webdriver.common.keys import Keys


url = "https://www.google.com"
driver = webdriver.Chrome()
driver.get(url)

button = driver.find_element(By.ID, "button")
button.click()

input_box = driver.find_element(By.ID, "id")
input_box.send_keys("Hello World")
input_box.send_keys(Keys.ENTER)

time.sleep(5)
driver.close()
操作網頁元素
利用 id 尋找按鈕
按下按鈕
import time
from selenium import webdriver
from selenium.webdriver.common.by import By
from selenium.webdriver.common.keys import Keys


url = "https://www.google.com"
driver = webdriver.Chrome()
driver.get(url)

button = driver.find_element(By.ID, "button")
button.click()

input_box = driver.find_element(By.ID, "id")
input_box.send_keys("Hello World")
input_box.send_keys(Keys.ENTER)

time.sleep(5)
driver.close()
操作網頁元素
利用 id 尋找輸入框
輸入文字
按下 enter
操作網頁元素
操作網頁元素
輸入特殊字元
例如:enter、up、backspace
在開頭先加上這一行
from selenium.webdriver.common.keys import Keys操作網頁元素
等待
等待
元素必須存在且顯示在頁面上,
才可以使用 selenium 操作,
因此,若是遇到網頁重整 ...... 等時,
就必須添加等待,
避免程式出錯。
等待
等待
- 隱性等待 Implicit waits:
- 無法針對特定狀況設定等待時間。
- 也沒辦法設定條件。
等待
-
顯性等待 Implicit waits:
- 可設定條件,避免浪費。
- 隱性等待 Implicit waits:
- 無法針對特定狀況設定等待時間。
- 也沒辦法設定條件。
隱性等待
隱性等待
driver.implicitly_wait(time_to_wait=10)隱性等待
driver.implicitly_wait(time_to_wait=10)預設為 0,
代表沒有找到該元素就立即報錯,
如果設定了隱性等待,
將會在報錯前等待指定時間。
顯性等待
顯性等待
需在開頭加上這兩行
from selenium.webdriver.support.wait import WebDriverWait
from selenium.webdriver.support import expected_conditions as EC
顯性等待
WebDriverWait(driver, timeout=10).until(
	EC.presence_of_element_located((By.ID, "id"))
)
顯性等待
WebDriverWait(driver, timeout=10).until(
	EC.presence_of_element_located((By.ID, "id"))
)
等待直到元素出現在頁面上,
若是等待時間超過指定時間,
程式將報錯。
範例
範例
import time
from selenium import webdriver
from selenium.webdriver.common.by import By
from selenium.webdriver.common.keys import Keys
from selenium.webdriver.support.wait import WebDriverWait
from selenium.webdriver.support import expected_conditions as EC


url = "https://www.google.com"
driver = webdriver.Chrome()
driver.get(url)

search_input = driver.find_element(By.XPATH, '/html/body/div[1]/div[3]/form/div[1]/div[1]/div[1]/div/div[2]/textarea')
search_input.send_keys("Hello World")
search_input.send_keys(Keys.ENTER)

WebDriverWait(driver, timeout=3).until(
	EC.presence_of_element_located((By.XPATH, '/html/body/div[3]/div/div[13]/div[1]/div[2]/div[2]/div/div/div[1]/div/div/div[1]/div/div/span/a'))
)
link = driver.find_element(By.XPATH, '/html/body/div[3]/div/div[13]/div[1]/div[2]/div[2]/div/div/div[1]/div/div/div[1]/div/div/span/a')
link.click()

time.sleep(5)
driver.close()
官方文件
補充
反反爬蟲
常見的反爬蟲
常見的反爬蟲
- 判斷 headers
常見的反爬蟲
- 判斷 headers
- 使用動態頁面
常見的反爬蟲
- 判斷 headers
- 使用者行為判斷
- 使用動態頁面
常見的反爬蟲
- 判斷 headers
- 加入驗證碼
- 使用者行為判斷
- 使用動態頁面
常見的反爬蟲
- 判斷 headers
- 封鎖特定 IP
- 加入驗證碼
- 使用者行為判斷
- 使用動態頁面
加入 headers
加入 headers
發送 GET / POST 請求時,
除了內容之外,
還會加上標頭來記錄各種資料,
用以表示瀏覽器的資訊,
其中包含:
User Agent、Cookie、Referer ... ... 等。
加入 headers
加入 headers
User Agent:
描述你所使用的瀏覽器,
若是來自不同用戶,
User-Agent 便不會相同,
利用切換 User Agent,
降低被判定為機的機率。
加入 headers
加入 headers
Cookie:
瀏覽網頁時,
伺服器透過瀏覽器存放在使用者電腦中
的一小段文字檔案,
儲存例如登入等資訊。
加入 headers
Referer:
代表你從哪個網頁進來,
例如從 google 搜尋中進入網頁,
Referer 就會是
https://google.com。
加入 headers
加入 headers
加入 headers
對網頁右鍵「 檢查 」,
加入 headers
對網頁右鍵「 檢查 」,
點選其中一項資源,
加入 headers
對網頁右鍵「 檢查 」,
點選其中一項資源,
點選上方工具列「 網路 」,
加入 headers
對網頁右鍵「 檢查 」,
點選其中一項資源,
點選上方工具列「 網路 」,
就可以查看 headers
加入 headers
對網頁右鍵「 檢查 」,
點選其中一項資源,
點選上方工具列「 網路 」,
就可以查看 headers
或是,點這裡查看。
加入 headers
加入 headers
由於不同網站
會透過不同資訊來判別爬蟲,
所以最好的辦法是
直接接整段 headers 貼到程式碼中。
加入 headers
加入 headers

加入 headers
加入 headers
import requests


headers = {
    "User-Agent": "Mozilla/5.0 (Macintosh; Intel Mac OS X 10_15_7) AppleWebKit/605.1.15 (KHTML, like Gecko) Version/17.5 Safari/605.1.15",
  	"Cookie": "SIDCC=AKEyXzVrdOQDA5WoALfVMOqs4y-IVOs7yQoXmerRJfCbRVXxQmGUob763wHvc8bh3QvdeEJypw; __Secure-1PSIDCC=AKEyXzX2PBYfH9RZQqen48eQR9Z5zX-G-TravEc1uHdi_PbuGBPiDQ4cUaPvqD2YHJIZlpJs8g; __Secure-1PSIDTS=sidts-CjIB4E2dkcmzD0U206aS2Q1Ds89ya10sp9EYbxo14Pl6O-5N_pkw01YNJvtnTcXSBxpFpRAA; __Secure-3PSIDCC=AKEyXzUyH-2wAfi-fhgUh75UDk17iWrzfzydXboifCex1z0_lYOJlZzV3DdHui5lWZUqTPbla84; __Secure-3PSIDTS=sidts-CjIB4E2dkcmzD0U206aS2Q1Ds89ya10sp9EYbxo14Pl6O-5N_pkw01YNJvtnTcXSBxpFpRAA; NID=516=nvJlDK0xh7nd8raOUgeZFvj1z14fcbO6yxHTJE-L7jTmQHdJma8ZGOkdQSd8AXPAw2bN-sHHseaLYYnlxDQc7cL34R1uiwkVpq264Ow1xjTBIc73mXIbXjFl4reV2BJYQAEqBgEBPGxyFTQsXUbf9q5NCZJDWkWeWzx_Y1p-3ptVpkmK-4Ei1xz5y4rlVk6TVGPXIAuNU3BoiBgUG8c0WhZ-Pm80MSc64uM2Mjt2cgtuvdmR2WQtZ1h-5PaJ-gkc7RHe9gi5O3CscE-L5rdVSf6lFav7k2JMErBRKGG1nI1f3OkeipRTcBTCgpHyx8qP5xkvqYuTre5nnHGG7P8pkxlieacdJKdloG2YIsWwy0rDtay7uAVDCV5ftF1PCeL9ndGzK2ju87WVKk4EWWGLhX6Bwrgl2sraZAc9LCZ6N23HOcDEvHD_A467rUwPJSBeBVQ_9KpEuinEN3szORj33qJkkNx6WxQ5uwUkVgIxKAb_rp-gQAgoe1y9GrTecWsMxI9tXdS07eCiJbN4era6XeWbtAdmnQZeAAdYRub0CmzK2FZxltAwnWulDu1jUF-2qtHI0svAejATNwHlHPdd399eNMJ4R0peiATp2KdrERX7-VelZWyP2B-f-Pw4R0vnK7CC-R6kesHD9IaFC3k5vvDATF3EezySVRvow4O6dnlE-bSHnVrsuNMPryjUifMCBhsMKfZu8u54z_s7l0pXZHxocDSq1kpzrYImXbk9IYmXxIs6ciG3uAKsj2JHu5hHao44YfZvw3Gu4Unrboisisv6uqgieGDupN39ATRLtzH7SOHquQVHRxQ33fo37YIHYJrX1mTxbLSrutxLXelVZr3CbwZvjXrzYDkX9eTRlzr2pXCtea8zD2xLuJaYsr-2VG2gBusBHlNQ07BT7YffjJHe8VqC53PX2E95JJSWONTu7XhiMA20qa0SHid28B0-j6iBKd1PJKuUqorHX5r-BGbjSyk9yoQhWTOMXk-oRicKhKVs9PjWuEaCg2qQw1qk8nApYnZ-t1q7Q6UbzguFdGBrDPj7E2l1P58; AEC=AVYB7cqDVe78uYM9VMncSZ-SB0Bqnk3PehUOPp7EmWjZ7Lo6vHrkdeOlG38; OGPC=19031728-1:19031779-1:19037049-1:19031496-1:; OTZ=7649487_24_24__24_; APISID=zRQutbpagY0IhShW/Ap2uc-Jb5PA6VAztu; HSID=AUIQNqgKPpzb96Ttg; SAPISID=mGrFl-_3tN061Jst/AlmAIhjNXsjlFzdWV; SID=g.a000lwhoLcf3GYlsEmBXq2j8-dlBrvDOmRRvuM9VEXCS_CexIM9kl7lWbSFb5DCvJl9Yf8dgsQACgYKAVkSARMSFQHGX2Mis864UVC3jLlW3C5a_O9n0RoVAUF8yKq_p5pfkaYKhLs-nN34V-Fj0076; SSID=AVy2l2zp2kOjCjEDf; __Secure-1PAPISID=mGrFl-_3tN061Jst/AlmAIhjNXsjlFzdWV; __Secure-1PSID=g.a000lwhoLcf3GYlsEmBXq2j8-dlBrvDOmRRvuM9VEXCS_CexIM9k7sfqfxS0HHrCSdFTAR2IhwACgYKAfESARMSFQHGX2MigHEBBRBbeRG0yW-dsaDAtRoVAUF8yKplbN2VJU9Mn6tiUJpIQnwp0076; __Secure-3PAPISID=mGrFl-_3tN061Jst/AlmAIhjNXsjlFzdWV; __Secure-3PSID=g.a000lwhoLcf3GYlsEmBXq2j8-dlBrvDOmRRvuM9VEXCS_CexIM9kqkbK84y6Alq2U28Jd3LMEQACgYKAQ4SARMSFQHGX2MirEa-NusKYc1w901PKheF3xoVAUF8yKqZS6u2EBgfRQ_smSyzrhUp0076; SEARCH_SAMESITE=CgQIyZsB; __Secure-BUCKET=CMoH"
    "Referer": "https://google.com"
}
url = "https://www.google.com"
response = requests.get(url=url, headers=headers)
隨機 User Agent
隨機 User Agent
利用現成的函式庫
來生成隨機的 User Agent,
首先,下載函式庫
pip install fake-useragent隨機 User Agent
import requests
from fake_useragent import UserAgent


headers = {
    "User-Agent": "Mozilla/5.0 (Macintosh; Intel Mac OS X 10_15_7) AppleWebKit/605.1.15 (KHTML, like Gecko) Version/17.5 Safari/605.1.15",
  	"Cookie": "SIDCC=AKEyXzVrdOQDA5WoALfVMOqs4y-IVOs7yQoXmerRJfCbRVXxQmGUob763wHvc8bh3QvdeEJypw; __Secure-1PSIDCC=AKEyXzX2PBYfH9RZQqen48eQR9Z5zX-G-TravEc1uHdi_PbuGBPiDQ4cUaPvqD2YHJIZlpJs8g; __Secure-1PSIDTS=sidts-CjIB4E2dkcmzD0U206aS2Q1Ds89ya10sp9EYbxo14Pl6O-5N_pkw01YNJvtnTcXSBxpFpRAA; __Secure-3PSIDCC=AKEyXzUyH-2wAfi-fhgUh75UDk17iWrzfzydXboifCex1z0_lYOJlZzV3DdHui5lWZUqTPbla84; __Secure-3PSIDTS=sidts-CjIB4E2dkcmzD0U206aS2Q1Ds89ya10sp9EYbxo14Pl6O-5N_pkw01YNJvtnTcXSBxpFpRAA; NID=516=nvJlDK0xh7nd8raOUgeZFvj1z14fcbO6yxHTJE-L7jTmQHdJma8ZGOkdQSd8AXPAw2bN-sHHseaLYYnlxDQc7cL34R1uiwkVpq264Ow1xjTBIc73mXIbXjFl4reV2BJYQAEqBgEBPGxyFTQsXUbf9q5NCZJDWkWeWzx_Y1p-3ptVpkmK-4Ei1xz5y4rlVk6TVGPXIAuNU3BoiBgUG8c0WhZ-Pm80MSc64uM2Mjt2cgtuvdmR2WQtZ1h-5PaJ-gkc7RHe9gi5O3CscE-L5rdVSf6lFav7k2JMErBRKGG1nI1f3OkeipRTcBTCgpHyx8qP5xkvqYuTre5nnHGG7P8pkxlieacdJKdloG2YIsWwy0rDtay7uAVDCV5ftF1PCeL9ndGzK2ju87WVKk4EWWGLhX6Bwrgl2sraZAc9LCZ6N23HOcDEvHD_A467rUwPJSBeBVQ_9KpEuinEN3szORj33qJkkNx6WxQ5uwUkVgIxKAb_rp-gQAgoe1y9GrTecWsMxI9tXdS07eCiJbN4era6XeWbtAdmnQZeAAdYRub0CmzK2FZxltAwnWulDu1jUF-2qtHI0svAejATNwHlHPdd399eNMJ4R0peiATp2KdrERX7-VelZWyP2B-f-Pw4R0vnK7CC-R6kesHD9IaFC3k5vvDATF3EezySVRvow4O6dnlE-bSHnVrsuNMPryjUifMCBhsMKfZu8u54z_s7l0pXZHxocDSq1kpzrYImXbk9IYmXxIs6ciG3uAKsj2JHu5hHao44YfZvw3Gu4Unrboisisv6uqgieGDupN39ATRLtzH7SOHquQVHRxQ33fo37YIHYJrX1mTxbLSrutxLXelVZr3CbwZvjXrzYDkX9eTRlzr2pXCtea8zD2xLuJaYsr-2VG2gBusBHlNQ07BT7YffjJHe8VqC53PX2E95JJSWONTu7XhiMA20qa0SHid28B0-j6iBKd1PJKuUqorHX5r-BGbjSyk9yoQhWTOMXk-oRicKhKVs9PjWuEaCg2qQw1qk8nApYnZ-t1q7Q6UbzguFdGBrDPj7E2l1P58; AEC=AVYB7cqDVe78uYM9VMncSZ-SB0Bqnk3PehUOPp7EmWjZ7Lo6vHrkdeOlG38; OGPC=19031728-1:19031779-1:19037049-1:19031496-1:; OTZ=7649487_24_24__24_; APISID=zRQutbpagY0IhShW/Ap2uc-Jb5PA6VAztu; HSID=AUIQNqgKPpzb96Ttg; SAPISID=mGrFl-_3tN061Jst/AlmAIhjNXsjlFzdWV; SID=g.a000lwhoLcf3GYlsEmBXq2j8-dlBrvDOmRRvuM9VEXCS_CexIM9kl7lWbSFb5DCvJl9Yf8dgsQACgYKAVkSARMSFQHGX2Mis864UVC3jLlW3C5a_O9n0RoVAUF8yKq_p5pfkaYKhLs-nN34V-Fj0076; SSID=AVy2l2zp2kOjCjEDf; __Secure-1PAPISID=mGrFl-_3tN061Jst/AlmAIhjNXsjlFzdWV; __Secure-1PSID=g.a000lwhoLcf3GYlsEmBXq2j8-dlBrvDOmRRvuM9VEXCS_CexIM9k7sfqfxS0HHrCSdFTAR2IhwACgYKAfESARMSFQHGX2MigHEBBRBbeRG0yW-dsaDAtRoVAUF8yKplbN2VJU9Mn6tiUJpIQnwp0076; __Secure-3PAPISID=mGrFl-_3tN061Jst/AlmAIhjNXsjlFzdWV; __Secure-3PSID=g.a000lwhoLcf3GYlsEmBXq2j8-dlBrvDOmRRvuM9VEXCS_CexIM9kqkbK84y6Alq2U28Jd3LMEQACgYKAQ4SARMSFQHGX2MirEa-NusKYc1w901PKheF3xoVAUF8yKqZS6u2EBgfRQ_smSyzrhUp0076; SEARCH_SAMESITE=CgQIyZsB; __Secure-BUCKET=CMoH"
  	"Referer": "https://google.com"
}

ua = UserAgent()
headers["User-Agent"] = ua.random

url = "https://www.google.com"
response = requests.get(url=url, headers=headers)
破解動態網頁
破解動態網頁
使用 Selenium,
畢竟它本來就是個瀏覽器,
只是利用程式控制。
使用者行為判斷
使用者行為判斷
每個網站的判斷方式不一樣,
例如在按鈕點擊前,
要先將滑鼠移到按鈕上,
或是判斷刷新網頁的時間 ... ... 等。
破解驗證碼
破解驗證碼
先將驗證碼下載下來,
再利用 2Captcha 來破解,
等於做了兩次爬蟲。
此外,2Captcha 需要一點錢,
所以要先花點時間在幫忙解驗證碼,
賺點小錢。
使用 Proxy
使用 Proxy
使用代理伺服器,
許多地方也有提供免費 Proxy IP,
例如:Free Proxy List。
若要下載大量檔案,
也可以一直切換 Proxy IP,
降低被封鎖的機率。
使用 Proxy
使用 Proxy
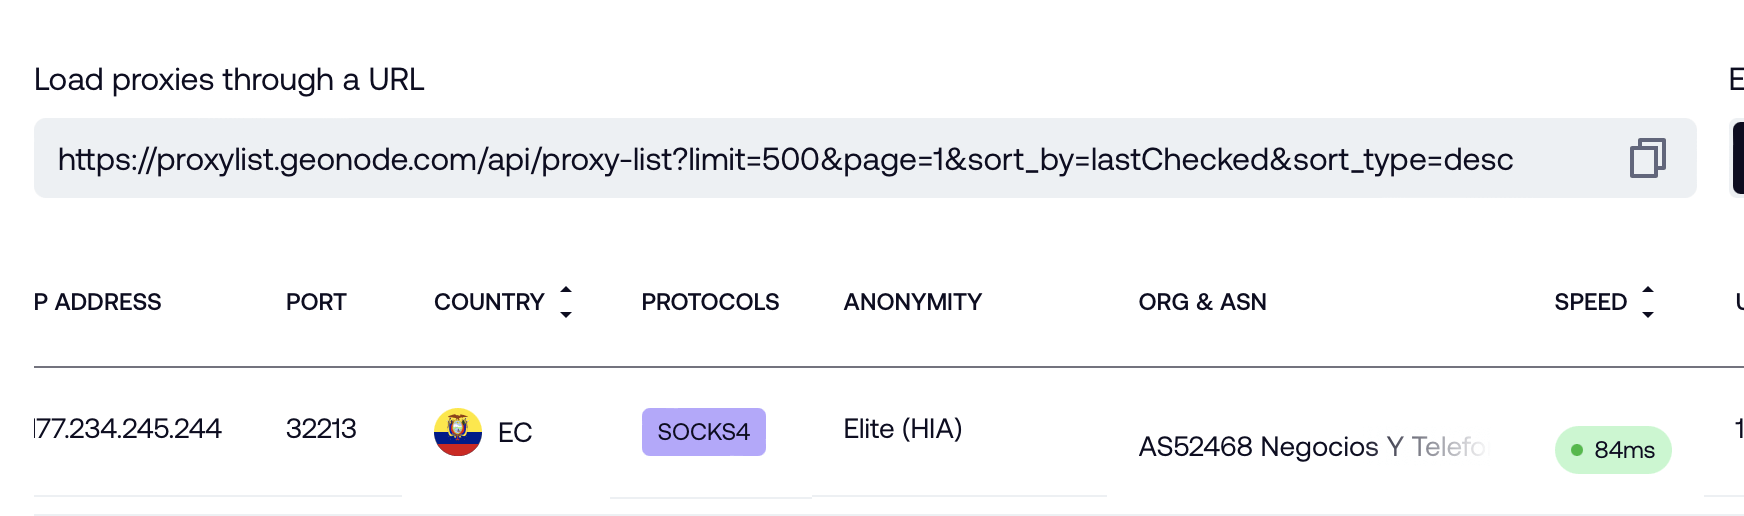
直接用爬蟲爬所有 Proxy IP 最快
import requests


def get_proxy_ip_list(limit):
    url = f"https://proxylist.geonode.com/api/proxy-list?limit={limit}&page=1&sort_by=lastChecked&sort_type=desc"
    response = requests.get(url=url)

    proxy_ip_list = []
    for proxy in response.json()["data"]:
        proxy_ip_list.append({
            proxy["protocols"][0]: proxy["ip"]
        })

    return proxy_ip_list


url = "https://www.google.com"
for proxy_ip in get_proxy_ip_list(500):
    response = requests.get(url=url, proxies=proxy_ip)

    print(response.text)
使用 Proxy
範例
GET vs. POST
GET 所謂的公開參數
代表可以將參數包含在 url 尾部
例如:
import requests


url = "https://httpbin.org/anything?key1=value1&key2=value2"
response = requests.put(url=url)

print(response.text)
GET vs. POST
也可以改成這樣
import requests


url = "https://httpbin.org/anything"
payload = {
    "key1": "value1",
    "key2": "value2"
}
response = requests.get(url=url, params=payload)

print(response.text)
GET vs. POST
而 POST 中的參數不會包含在 url 中。
import requests


url = "https://httpbin.org/anything"
payload = {
    "key1": "value1",
    "key2": "value2"
}
response = requests.post(url=url, data=payload)

print(response.text)
content vs. raw
- text:讀取文字
- content:讀取圖片、音訊 ... ...
- raw:讀取大型圖片、音訊 ... ..., 須在串流模式時使用
content vs. raw
import requests


url = "https://httpbin.org/image/jpeg"
response = requests.get(url=url)

with open("講義程式碼/1-2 image.jpeg", "wb") as file:
    file.write(response.content)
content vs. raw
import requests
import shutil


url = "https://httpbin.org/image/jpeg"
response = requests.get(url=url, stream=True)

with open("講義程式碼/1-2 image2.jpeg", "wb") as file:
    shutil.copyfileobj(response.raw, file)
content vs. raw
import requests
import shutil


url = "https://live.staticflickr.com/65535/52259221868_3d2963c1fe_o_d.png"
response = requests.get(url=url, stream=True)

with open("講義程式碼/1-2 large image.png", "wb") as file:
    for chunk in response:
        file.write(chunk)
以每秒 128 byte 下載檔案
python 網路爬蟲
By kaoshawn